
Premessa:
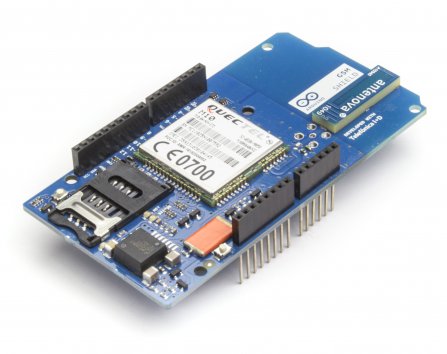
Con questa guida potrete controllare un modulo GSM/GPRS di Arduino e inviare messaggi effettuare chiamate e connettervi a internet. La procedura è molto semplice collegate il vostro Arduino, nel nostro caso stiamo usando la versione UNO al modulo Shield GSM/GPRS. Una volta conesso tramite i pin header non vi rimane che caricare i rispettivi sketch: SMS – CHIAMATA – HTTP_APN. Questi sketch potrebbero essere utili, implementando ad esempio a uno sketch più articolato che permette di aprire un cancello tramite una chiamata vocale oppure un sms.
Unica NOTA importante nella richiesta HTTP_APN l’ultimo sketch bisogna inserire i dati acesso del gestore della SIM che inserirete. quindi se fosse wind nel nostro caso era wap.wind con credenziali wind e password wind da gestore Controllare.
LISTA DEI MATERIALI:
Librerie:
- GSM LGPL: arduino.cc/en/Reference/GSM
SKETCH ARDUINO SMS
/*

SKETCH: CHIAMATA SMS

DEFINIRE PINNUMBER CON CODICE PIN SIM
DEFINIRE remoteNumber CON NUMERO DEL DESTINATARIO MEX

*/

#include < GSM.h >

#define PINNUMBER "2203"

// initialize the library instance
GSM gsmAccess; // include a 'true' parameter for debug enabled
GSM_SMS sms;

// char array of the telephone number to send SMS
// change the number 1-212-555-1212 to a number
// you have access to
char remoteNumber[20]= "3334445556";

// char array of the message
char txtMsg[200]="Test";

void setup()
{
  // initialize serial communications
  Serial.begin(9600);

  Serial.println("SMS Messages Sender");

  // connection state
  boolean notConnected = true;

  // Start GSM shield
  // If your SIM has PIN, pass it as a parameter of begin() in quotes
  while(notConnected)
  {
    if(gsmAccess.begin(PINNUMBER)==GSM_READY)
      notConnected = false;
    else
    {
      Serial.println("Not connected");
      delay(1000);
    }
  }
  Serial.println("GSM initialized");
  sendSMS();
}

void loop()
{
// nothing to see here
}

void sendSMS(){

  Serial.print("Message to mobile number: ");
  Serial.println(remoteNumber);

  // sms text
  Serial.println("SENDING");
  Serial.println();
  Serial.println("Message:");
  Serial.println(txtMsg);

  // send the message
  sms.beginSMS(remoteNumber);
  sms.print(txtMsg);
  sms.endSMS();
  Serial.println("\nCOMPLETE!\n");
}
SKETCH ARDUINO CHIAMATA VOCALE
/* SKETCH: CHIAMATA VOCALE

DEFINIRE PINNUMBER CON IL CODICE PIN DELLA SIM

MONITOR SERIALE:
PASSARE IL NUMERO DI TELEFONO DA CONTATTARE

NOTA BENE: SPECIFICA IMPORTANTE INSERIRE SU MONITOR
           SERIALE SPUNTA RITORNO A CAPO A(NL).

*/


#include < GSM.h >

// PIN Number
#define PINNUMBER "2203"

// initialize the library instance
GSM gsmAccess; // include a 'true' parameter for debug enabled
GSMVoiceCall vcs;

String remoteNumber = "";  // the number you will call
char charbuffer[20];

void setup()
{

  // initialize serial communications
  Serial.begin(9600);

  Serial.println("Make Voice Call");

  // connection state
  boolean notConnected = true;

  // Start GSM shield
  // If your SIM has PIN, pass it as a parameter of begin() in quotes
  while(notConnected)
  {
    if(gsmAccess.begin(PINNUMBER)==GSM_READY)
      notConnected = false;
    else
    {
      Serial.println("Not connected");
      delay(1000);
    }
  }

  Serial.println("GSM initialized.");
  Serial.println("Enter phone number to call.");

}

void loop()
{

  // add any incoming characters to the String:
  while (Serial.available() > 0)
  {
    char inChar = Serial.read();
    // if it's a newline, that means you should make the call:
    if (inChar == '\n')
    {
      // make sure the phone number is not too long:
      if (remoteNumber.length() < 20)
      {
        // show the number you're calling:
        Serial.print("Calling to : ");
        Serial.println(remoteNumber);
        Serial.println();

        // Call the remote number
        remoteNumber.toCharArray(charbuffer, 20);


        // Check if the receiving end has picked up the call
        if(vcs.voiceCall(charbuffer))
        {
          Serial.println("Call Established. Enter line to end");
          // Wait for some input from the line
          while(Serial.read()!='\n' && (vcs.getvoiceCallStatus()==TALKING));
          // And hang up
          vcs.hangCall();
        }
        Serial.println("Call Finished");
        remoteNumber="";
        Serial.println("Enter phone number to call.");
      }
      else
      {
        Serial.println("That's too long for a phone number. I'm forgetting it");
        remoteNumber = "";
      }
    }
    else
    {
      // add the latest character to the message to send:
      if(inChar!='\r')
        remoteNumber += inChar;
    }
  }
}
SKETCH ARDUINO GPRS HTTP_APN
/*

SKETCH: RICHIAMATA RICHIESTA HTTP_APN

DEFINIRE PINNUMBER CON IL CODICE PIN DELLA SIM
DEFINIRE GPRS-APN-LOGIN-PASSWORD--->VEDERE PARAMETRI GESTORE

*/


// include the GSM library
#include < GSM.h >

// PIN number if necessary
#define PINNUMBER "2203"

// APN information obrained from your network provider
#define GPRS_APN       "wap.wind" // replace with your GPRS APN
#define GPRS_LOGIN     "wind"    // replace with your GPRS login
#define GPRS_PASSWORD  "wind" // replace with your GPRS password

// initialize the library instances
GSMClient client;
GPRS gprs;
GSM gsmAccess;

// This example downloads the URL "http://arduino.cc/latest.txt"

char server[] = "robot-domestici.it"; // the base URL
char path[] = ""; // the path
int port = 80; // the port, 80 for HTTP

void setup()
{
  // initialize serial communications
  Serial.begin(9600);
  Serial.println("Starting Arduino web client.");
  // connection state
  boolean notConnected = true;

  // Start GSM shield
  // pass the PIN of your SIM as a parameter of gsmAccess.begin()
  while(notConnected)
  {
    if((gsmAccess.begin(PINNUMBER)==GSM_READY) &
        (gprs.attachGPRS(GPRS_APN, GPRS_LOGIN, GPRS_PASSWORD)==GPRS_READY))
      notConnected = false;
    else
    {
      Serial.println("Not connected");
      delay(1000);
    }
  }

  Serial.println("connecting...");

  // if you get a connection, report back via serial:
  if (client.connect(server, port))
  {
    Serial.println("connected");
    // Make a HTTP request:
    client.print("GET ");
    client.print(path);
    client.println(" HTTP/1.0");
    client.println();
  }
  else
  {
    // if you didn't get a connection to the server:
    Serial.println("connection failed");
  }
}

void loop()
{
  // if there are incoming bytes available
  // from the server, read them and print them:
  if (client.available())
  {
    char c = client.read();
    Serial.print(c);
  }

  // if the server's disconnected, stop the client:
  if (!client.available() && !client.connected())
  {
    Serial.println();
    Serial.println("disconnecting.");
    client.stop();

    // do nothing forevermore:
    for(;;)
      ;
  }
}
Buon progetto.